Choosing and fitting grab rails
Choosing and fitting grab rails
This factsheet is available for sponsorship, email marketing@dlf.org.uk
Sponsorship has no influence on our impartial content
Factsheet contents
- Introduction
- Types of grab rails
- The material and finish of the grab rail
- Positioning of grab rails
- In the bathroom
- In the shower
- In the toilet
- Rails for stairs and corridors
- Grab rails at the entrance to a property
- Hand rails for external steps
- Fixing of grab rails
- Traditional bricks and concrete blocks
- Lightweight aerated and hollow bricks
- Partition and stud walls
- Electrics and grab rails
- Identifying your needs
- Health and social care needs assessment
- Funding sources
- Statutory direct payment, personal budgets and prescriptions
- Private purchase
- Charity and grant funding
- VAT relief
- Further advice from us
- Useful organisations
- References
- to push or pull against when standing up
- to provide a steadying support while sitting down
- to provide a firm grip when transferring from one position to another
- for balance when standing and carrying out an activity, like walking or negotiating the stairs.
- plastic
- stainless steel
- steel
- wood
- brass.
- your own requirements
- the support you require
- your height and weight
- the amount of mobility and strength you have in your hands, arms and shoulders.
- Planning documents for accessible and wheelchair user property - Approved Document M. Volumes 1 and 2. Access to and use of buildings (NBS 2016, 2015). Other approved documents (C and mostly K) complete its guidance on steps, stairs or ramps and the most suitable handrails for them. Available from: https://www.planningportal.co.uk/info/200135/approved_documents
- British Standard BS 8300:2009+A1:2010, Design of buildings and their approaches to meet the needs of disabled people. Code of practice. This looks at the design of buildings and their ability to meet the requirements of disabled people. It looks at how some facilities, such as corridors, car parks and entrances, can be designed to provide aids for disabled people. It also demonstrates how additional features, including ramps, signs, lifts and guard rails, can be installed. Available from the BSI shop
- College of Occupational Therapists (2006) Minor adaptations without delay. London: COT. This guide is intended for housing associations involved in fitting ‘minor adaptations’ for tenants, such as stair rails. It gives technical specifications and examples of good practice. Available from: https://www.rcot.co.uk/practice-resources/rcot-publications/downloads/minor-adaptations-without-delay
- 1. A vertical rail for support when standing from the toilet (this can provide a hold for pulling up from if you have strong upper limbs). The lowest point of the rail is sited approximately 150–190mm in front of the knee while seated on the toilet (approx 300mm in front of the edge of the toilet pan) and 50–70mm above the inside of the elbow crease (DLF 2014). Part M of the Building Regulations suggests that the rail should be at least 600mm long and can be fixed to the wall at a height of 800mm above the floor (H M Government 2015, p52, diagram 21). If you place your hand where the rail would be, you can check that the position is correct for you, and that the rail is sufficiently far forward to maintain a stable position once standing.
- 2. A 600mm long horizontal rail 680mm from the floor beside, and extending in front, of the toilet pan for use when sitting down on the toilet. This rail can be horizontal or set at an angle of up to 15 degrees (H M Government 2015, p52, diagram 21). Alternative suggested measurements are a minimum 500mm long rail, at a height of 600mm from the floor, with the rear fixing 400mm from the wall at the rear of the toilet (COT 2006, p12)
- getting in and out of the bath, or stepping into or standing in a shower
- sitting down or standing up from the toilet, or standing to manage your clothes when using a toilet
- standing by your front door to unlock it and then stepping up and over the threshold
- going up and down the stairs.
Introduction
The aim of this factsheet is to provide basic information and suggestions for you if you are considering installing some grab rails. It will cover factors related to your personal needs and circumstances, together with details about useful features and the positioning of rails. If you have very particular requirements you are advised to seek professional assessment and advice.
Grab rails can be positioned anywhere in and around the home to provide support. Conveniently placed rails will provide help in four ways:
Most grab rails are attached to the wall, or from wall to floor, although floor to ceiling rails are available. Sometimes a combination of vertical and horizontal rails can be helpful. The type and positioning required will depend upon your grip and arm strength and the material used in the construction of the home.
Types of grab rail
There are many types of grab rail. The main types are briefly introduced below, before going into greater detail about grab rails and their use in specific areas of the home.
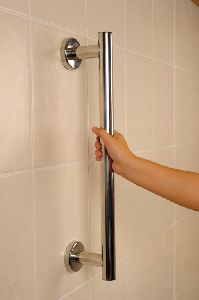
Straight rails
 These are wall-fixed rails which run in one direction only. They can be fixed in a horizontal or a vertical position, or at an incline or angle.
Horizontal rails may help when pushing up from sitting and provide support when lowering, e.g. on to a toilet. Most people find it easier to push down on a rail rather than pull on one, so horizontal rails are more commonly used.
Vertical rails may assist when pulling up into a standing position or for just maintaining balance.
Rails set at an angle can help a person who needs a steadying support - e.g. to stand from a bath board to shower. The rail can be placed at an angle of 45 degrees up and away from the user. This keeps the wrist in a neutral position. It is not necessary to lean far forward to grasp the rail at the lower end and the hand can travel up the rail to maintain the support once the person is standing.
Rails set at an incline (fixed at a slight angle to the horizontal) may assist someone with weak or painful arms or wrists to support his/her forearm on the rail whilst pushing up, thus spreading the body weight over a larger area.
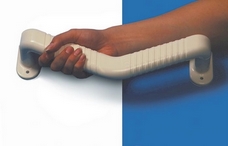
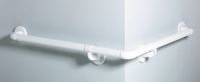
Pre-formed angled rails and right angled rails
 These are wall-fixed rails with an in-built angle.
The lower portion is usually set horizontally and acts as a forearm support. This enables the user's body weight to be distributed through his or her forearm which may be helpful for someone with painful hands or wrists.
The top section provides an angled or upright handhold.
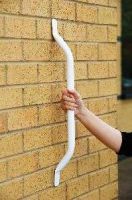
Cranked or offset rails are wall-fixed rails which have been designed to fit to frames and spaces to allow the user to step up to and through a doorway or space without releasing grip on the rail.
Floor to ceiling rails are vertical rails which are attached to both the floor and the ceiling. They can be held at any point up the bar for general support and can be useful in the process of standing up/sitting down.
 System rails are rails which can be put together to provide customised support over a large area, e.g. round a bathing area. They attach to the walls and can be cut or ordered to the required length.
Bends and angles can be fitted where required.
 Drop down rails are most often seen next to toilets.
They are fixed to the wall or to the floor behind the toilet and can fold down to a horizontal position alongside the toilet.
Some have a support leg which rests down on the floor when the rail is horizontal. Some models provide a single horizontal rail which provides support at one height; others consist of a looped rail which provides two alternative gripping positions. Some of these rails have a built-in toilet roll holder.
Rails that can be lifted up and out of the way can be useful for wheelchair users and people who use a hoist.
The material and finish of the grab rail
Grab rails may be made of:
Plastic rails may be reinforced with a metal core. Wooden rails have metal brackets at each end for attachment to the wall.
The finish of the rails may be important from an aesthetic point of view and also for the grip surface it provides.
A polished or chrome finish is attractive and hard wearing but can be quite slippery to hold, especially when hands are wet.
An epoxy, paint or plastic finish provides a warmer feel to rails, is hard wearing and will reduce the effects of condensation. A choice of colour allows for a colour contrast with the wall for users with low vision or for co-ordination of bathroom accessories.
 A high contrast finish may be helpful if you have low vision - choose grab rails in a colour that contrasts with the wall it is to be installed on.
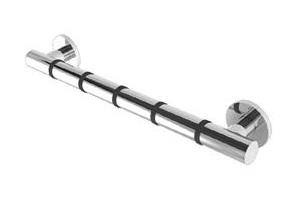
A slip resistant, knurled, ribbed or fluted finish is a moulded, coated, textured surface which provides extra grip even when wet. This finish may be uncomfortable for those with sensitive hands.
Positioning of grab rails
Correct positioning of grab rails is important to ensure that they provide the support, where necessary, to perform specific tasks. Although there is published guidance for the positioning of rails, you will also need to be guided by:
There are a number of published documents which can help in the positioning of rails. These are intended to give generic guidance to property developers or housing associations, but the principles and advice may be useful as a starting point. If you are installing grab rails into your current home, the ideal position for you will depend on your own unique needs, preferences, measurements and home environment:
The information given below is for general guidance only.
In the bathroom
Grab rails in a bathroom should have a ribbed or textured surface to give extra grip when wet.
Horizontal and inclined rails
When standing from a sitting position in the bath you may find it helpful to hold one horizontal wall-fixed grab rail (placed above the bath) with one hand and use the outer rim of the bath with the other hand to push against. There needs to be a 50-60mm clearance between the wall and all handrails.
 A rail can be fixed horizontally to the wall 75-100mm above the bath rim (see dimension c in diagram). It should start 200mm from the tap end of the bath (dimension a) (COT 2006 p13, H M Government 2015, p58, diagram 26).
Part of the rail can be fixed at an angle of 13° upwards towards the head end of the bath to provide an inclined support.
The horizontal rail can be used in combination with a bath board. The user may benefit from holding the rail while they sit on the board, then turn and lift their legs in and out of the bath.
Vertical rails
When stood in the bath - A rail (at least 500mm long) can be fixed vertically on the wall, 600mm from the tap end of the bath (dimension b in above diagram), with its lower end 200mm above the bath rim (COT 2006 p13, H M Government 2015, p58, diagram 26). This is most likely to be of use when stood in the bath (perhaps whilst showering) or when standing from a bathboard over the bath.
Transferring into the bath - A rail which attaches to both the floor and the ceiling on the outer edge of the bath may provide support when the person is turning round to step in or out of the bath. It is recommended that it should be sited 400mm from the tap end of the bath where it can be reached from a sitting position in the bath. However, its position is likely to be in the way of someone using a bath board, or bath transfer bench, when they swing their legs in and out of the bath. These rails should be fitted by experienced installers, as they take a lot of weight and ceiling fixation can be complicated.
Alternatively, if there are no obstructions outside the bath (e.g. the sink or toilet) a vertical grab rail could be installed on the wall at the tap end of the bath. This is useful when stepping in and out of the bath and also to hold onto if standing to shower.
The rail should be mounted at a height that the user can comfortably reach whilst stood both from outside the bath and from in the bath.
Bath side rails
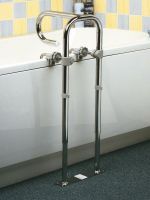
 Floor-mounted - These are screwed to the floor and also clamp onto the side of the bath. They can be adjusted to the thickness of the bath sides and some models are adjustable in height. A vertical loop projects above the bath's sidewall and is held when stepping in and out of the bath. The fixings need to be checked on a regular basis and tightened when necessary. Side rails cannot be used in combination with a bath board or bath transfer bench, as they will get in the way when they swing their legs in and out of the bath.
Bath-mounted - These only clamp onto the side of the bath and can be adjusted to the thickness of the bath sides. Some models are adjustable in height. As with the floor-mounted bath side rails, a vertical loop projects above the sidewall. Again, they cannot be used in combination with a bath board or bath transfer bench.
As these rails attach solely to the bath itself great care needs to be taken to ensure that the fixing mechanism - usually a screw system - remains secure. This needs to be checked on a regular basis and tightened when necessary. They are not recommended for attaching to a plastic or acrylic bath as there is a possibility that the surface may crack.
If possible, rails should be both bath- and floor-fixed for full stability.
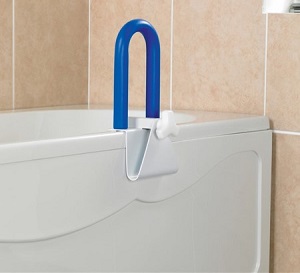
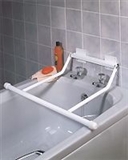
Cross-bath rails
 These fix to the wall behind the taps and rest on the bath rims. When sitting in the bath, the rail will be directly in front of the person at about chest height. In this position it will provide stability whilst in the bath. The rail should only have downward pressure applied so the weight is taken by the bath rim, it is not designed for the user to pull on to sit down or stand up from the base of the bath (Pain et al 2003).
Ensure that the wall is strong enough to take the weight of this type of rail. Care should be taken that the user never bends down underneath the rail (e.g. to reach their feet) when sat in the bath as they could trap their head under the rail
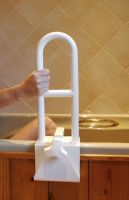
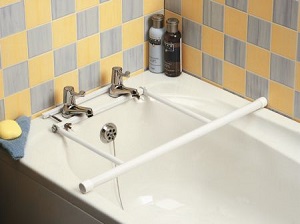
Tap-fixed rails
 These also rest on the bath rims but clamp around the bath taps and are therefore only as strong as the tap fixtures. Taps are not designed to withstand a full body weight pulling against them. The rail should only have downward pressure applied so the weight is taken by the bath rim - it is not designed for the user to pull on to sit down or stand up from the base of the bath (Pain et al, 2003). These rails fold down to rest on the bath rim and can be folded up against the wall when not required.
Further guidance on equipment for use in the bathroom is available in the DLF factsheet Choosing equipment for bathing.
In the shower
The following specifications are recommended in Part M of the Building Regulations. However, they should be used only as a generic guide when the users are not known. When an individual user is known, personal factors such as the height of the person should be given priority.
Horizontal rails
Drop down or fixed rails attached either side of the shower seat can help to prevent somebody sliding off a wet slippery seat. A rail can be fixed on to the wall at the side of the shower seat, approximately 200mm above the height of any seat. This may be used for help when standing and may assist wheelchair users to transfer across onto the seat from a wheelchair (H M Government 2015, p54, diagram 22). A drop down rail can be fixed on the rear wall, to drop down on the opposite side of the shower seat, with its top rail level with the wall-fixed rail.
In shower cubicles it may be useful to have an additional horizontal rail fixed on the wall opposite the shower seat at a height of 1m from the ground, if it can be easily reached from the seat.
Vertical rails
A vertical rail at least 500mm long can be fixed at the entrance to the shower compartment for use when stepping in and out of the cubicle. The rail should be mounted at a height that the user can comfortably reach whilst stood both from outside the cubicle and from in the cubicle.
Vertical rails can be installed on a wall, if present, opposite a shower seat. The lowest fixing should be fixed 800mm above floor level. However, the distance between the front of the seat and the rail must be less than 550mm if it is to be used successfully. If it is too far away, there is a risk of falling forward.
In the toilet
As the options below illustrate, there are many different types of equipment available to assist in transferring on and off the toilet. It is important that you select the equipment that is safe and appropriate for you, which can be influenced by many factors - for example, some equipment may not fit if there are pipes running along the wall at the back of the toilet. Raised toilet seats vary in their maximum user weights and grab rails may not be appropriate if the wall is too far from the toilet. We therefore recommend you arrange an assessment with an appropriate health care professional to discuss your difficulty standing and / or sitting on the toilet.
Grab rails by the toilet are often fixed to the wall alongside the toilet, but if this is not possible (due to the toilet being too far from the wall or a partition wall or a radiator being in the way for example), then a drop down rail that extends from the wall behind the toilet could be used (see below).
Straight grab rails
As a general guide there are two options for wall mounted rails by the toilet. If you have the same strength on both sides of your body it may be a good idea to have supports fixed on both sides of the toilet so that you can use both arms.
Using one rail: The rail is fitted starting at a point approximately 25mm forward of your knee and approximately 50-70mm above your elbow (when seated on the toilet with your arms down against your side), at an angle running at 45 degrees forwards and upwards away from you (DLF 2014). This may help you to support the weight of your arm whilst pulling with your hand higher up the rail. See above diagram.
An angled rail may be useful in this situation, to provide the same grip, but with support for the forearm. The angle of the rail would be sited at the same starting point as the straight rail, approximately 25mm forward of your knee and approximately 50-70mm above your elbow (when seated on the toilet with your arms down against your side).
Using a combination of two rails
Before fitting the rail/s, sit on the toilet and check you can reach the points where you intend to install them. Check the distance between the toilet pan and the side wall. If you have to lean sideways to reach the rail, it may not provide appropriate support. In this case a drop down rail fitted to the back wall, a wall to floor rail or a toilet surround frame may be more appropriate (DLF 2014). The measurements are a general guide only, the ideal location of the rails will depend on your individual size, reach and toilet location.
If you wish to use the toilet standing, then a vertical rail placed just in front of your knuckles when your arm is held at a right angle may steady you.
Drop down rails can be used where there is no adjoining wall next to the toilet.
A vertical rail in this position can also be useful to steady yourself as you manage your clothes.
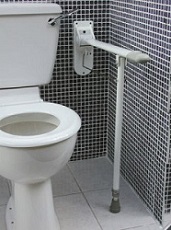
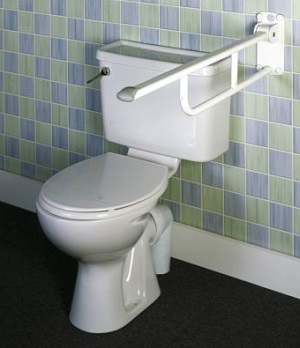
Drop down hinged rails
 These rails are useful when there is no suitable wall on which a standard grab rail can be fixed, or where space is a problem. In areas where there is a wall on only one side of the toilet, they can be used in combination with a fixed rail to provide support on both sides, but can be folded up out of the way to allow access for a wheelchair user or helper. They may be wall-mounted (at the back of the toilet) or floor fixed if the supporting wall is not strong enough.
These provide a horizontal bar in their lowered position. They should be fitted at waist/elbow level and approximately a fist width away from your thigh when sat on the toilet.
Some hinged wall-mounted rails can be supplied with a support leg which rests down on the floor when the rail is horizontal, transferring some of the load from the wall to the floor.
Wall to floor rails
These are static right-angled rails that attach to the wall behind the toilet and the floor in front of it. Like hinged drop down rails they are useful for providing support and stability where there is no adjacent wall but they cannot be lifted back out of the way.
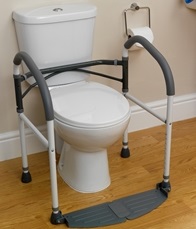
Toilet surround frames and toilet seats with frames
 If there are obstructions beside the toilet, such as a radiator, or the walls are not suitable for installing rails, you will need to look at alternative kinds of support.
Toilet frames are designed to provide horizontal support for pushing up from a toilet, or for steadying the body when lowering onto a toilet. The frame, which stands over the top of the toilet, can either be free standing or fixed to the floor.
It is essential to fix it to the floor if you have poor balance or co-ordination, or you push down more heavily on one side than the other.
Rails for stairs and corridors
Long handrails
Staircases usually have a handrail on one side, although this may not extend to the full length of the staircase. Most DIY stores sell handrails which can be used to extend the existing handrail all the way up the staircase if it is required. Adding a handrail to the other side of the staircase will provide more support where needed. Long lengths of rail are available and may also be installed along corridors.
A wide range of finished hand rails are available from DIY chains for you to choose from. A plain 50mm mop head cross section softwood rail may be used.
It is recommended that it is run continuously from the bottom to the top of your flight of stairs, including going around the edge of any intervening landings and across window openings. The handrail should be allowed to continue past the top and bottom steps by 300mm (COT 2006 p8, DLF 2014, H M Government 2013, p14, diagram1.11).
The height will depend on your needs, often at the same height as an existing banister rail. This is usually between 900-1000mm above the pitch line of the stairs (COT 2006, p8, H M Government 2013, p14, diagram1.11).
 The handrail should have a fixing at least every 1000mm and no more than 150mm from each end. It may require mounting on a pattress or backboard (see 'Fixing grab rails' below) which is then secured to the wall (COT 2006 p7).
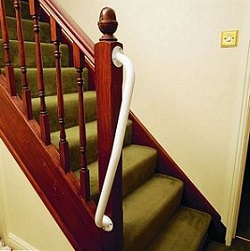
Newel rails
Newel rails are designed to turn through 90o around the newel post (the upright post of the stair banister). They provide a continuous grip as the user reaches the bottom or top of the stairs and turns the corner. They are available in a range of sizes.
Please note that left turning and right turning Newel rail models are available. Which one you require depends on which way your staircase turns after the newel post.
Further guidance is available in the DLF factsheet Choosing equipment to get up and down stairs.
Grab rails at the entrance to a property
Grab rails at a property entrance may be installed to assist you when ascending or descending steps to enter your home.
 Standard straight metal or plastic grab rails can be used but offset/cranked rails are also often used. The offset angle is designed so that you can step up to and pass through the doorway without releasing your grip on the rail. Be careful to place the rail where it does not block access to the door handle or lock.
The ideal height for the rail will depend on your height and reach, personal preference and the structure of the door frame or wall.
As a general rule the bottom fixing of a 450mm long vertical rail may be positioned 790mm above the internal floor (see dimension a) (COT 2006).
Hand-rails for external steps
If the difference in height between the internal floor level and the external path level is over 360mm an external hand rail such as a ground to wall, or ground to ground handrail should be considered and may be used in combination with a wall-fixed grab rail (COT 2006).
The same measurements apply as for an internal bannister
Fixing of grab rails
Grab rails are only as strong as the wall to which they are fixed and the fixings that are used. Unfortunately many modern houses which were built as cost-effective, thermally efficient buildings do not have internal walls that are ideal for the installation of wall fixtures such as support rails. They must be fitted securely to walls, floors or ceilings which can bear the weight of a person repeatedly pulling or pushing on the rail. The rail, the wall and the fitting of one to the other MUST be strong and secure. Solid brick or block walls are best. If you cannot safely fit the rails, you will need to look at an alternative means of support, such as a frame around the toilet.
Permanently fixed rails
Most grab rails are permanently fixed in one position onto the wall, floor, ceiling, or a combination. When fitted securely and correctly they should be able to cope with the push/pull forces of repeated use.
Temporarily fixed rails
Suction grab rails attach to a smooth surface by forming a strong suction grip at each end. Some manufacturers state that they are not weight-bearing and are only intended to assist with balance. Others do not clearly state this, but give a weight limit for safe use. You are advised to read any guidance and seek further clarification if needed before you use these rails. They are highlighted as portable for visits and holidays.
When using these rails you must consider the integrity and strength of the surface to which you are fixing them. For example, when fixed to wall tiles, the attachment of the tiles to the wall MUST be secure.
If you have underfloor heating, or if you have a sealed/waterproof floor, such as in a wetroom, you should avoid fixing rails into the floor. You must also consider where any services, such as water/drainage pipes and electricity cables run inside the walls or under the floor.
If you are unsure of the construction of your home, you should seek the advice of a builder. Many local authorities can provide information on local trusted handyman schemes. They may also be able to advise you, and fit rails if suitable.
Traditional bricks and concrete blocks
Good quality traditional masonry and bricks should cause no problems if the recommended fixtures and procedures are followed. A plasterboard or tiled surface should not affect the fixing, although ensure that the whole depth of the fixing is supported by the masonry.
Most dense concrete blocks are strong enough to support rails. However, care should be taken as their composition may make it difficult to drill a straight hole through them.
Lightweight aerated and hollow bricks
If the wall is made of lightweight, aerated and hollow brickwork, even the most appropriate fixings may not be able to withstand the loads which can be suddenly applied to rails and hinged arm supports.
The insides of the hollow blocks are often filled with a polystyrene type insulating material which will not provide enough support for fixtures screwed into it.
Similarly, aerated concrete blocks, which are often used in bathrooms and toilets as the waste pipes are carried through their cavities, are made of a very lightweight substance which limits their fixing support qualities. Supporting fixtures should be attached to this type of wall using specific wall mounted support products or battens.
Partition and stud walls
Even if a partition or stud wall is physically strong and stable and has a suitable flat surface to take a grab rail, the addition of a pattress or backboard on the wall is advised when fixing a grab rail to it.
This should be a flat, unknotted piece of wood, which is screwed into the vertical joining pieces of the partitions. The grab rails can then be attached to the board. The College of Occupational Therapists recommends a 144mm x 19mm board/pattress with its external corners well rounded and the board itself fixed to the wall at least every 900mm (COT 2006).
Particular care should be taken when attaching rails to domestic sandwich partitions, e.g. plasterboard with a hardboard facing.
Fixing to UPVC plastic door frames should be avoided as the frames are unlikely to have the necessary internal materials in the required area to support a grab rail's fixings.
When rails are installed outside or in a bathroom and are likely to become wet consider using brass or chromium-plated screws to avoid the formation of unsightly rust stains (COT 2006).
For help finding local competent traders, such as carpenters or handymen, who could fit a grab rail and who meet relevant standards you could visit trustatrader.com. In many areas the local authority or Age UK run a handyman scheme. For a small charge, and if you are over 60, this scheme may be able to assist with small jobs such as fitting grab rails, spy holes in your door, replacing tap washers and fitting smoke alarms or telephone extensions.
Electrics and grab rails
When installing a grab rail the installer should ensure there is no possibility that any metal part which may be touched by you, including fixing screws, will come into contact with electric cabling. They should follow British Standard BS 7671 Requirements for Electrical Installations. IET Wiring Regulations (BSI 2015).
Identifying your needs
Consider your daily routine. What movements are you making or what activities are you doing when you feel that additional support, or something to hold on to, would give you extra safety? For example:
Next consider your ability to grip onto a grab rail. Do you have reasonable hand strength? Do you ever have pain in your hands, wrists, elbows or shoulders which would prevent you from pulling up or pushing down on a grab rail? What is your overall balance and ability to stand like?
Look through the information on this sheet about the different kinds of grab rails. Identify the best types of rail for your particular requirements.
If you are very unstable when standing and you find it difficult to bear your own weight, simple grab rails may not be the most suitable answer for you. You may need more support to help you. Likewise, if you have very poor grip, or significant pain in your hands, arms or shoulders. Please see our other factsheets, especially those related to choosing equipment for bathing, showering and toileting and those related to beds, chairs and mobility. You may be able to find alternative ways of gaining the support and assistance you require to enable safety and independence.
If you are unsure about the best way to maintain your safety and independence, you are advised to seek a formal assessment of your needs from your local authority social services department, or from a private/independent occupational therapist.
Health and social care needs assessment
If you are struggling with caring for yourself, or your carer is struggling to provide care for you, consider asking for a health and social care needs assessment. Since the Care Act 2014 (Great Britain. Parliament 2014) came into power in April 2015, anyone who appears to need care and support can request an assessment from their local council, irrespective of their income or savings. The Act also places a statutory duty on local authorities and the NHS to support individuals to take steps to prevent their ill health or care requirements from getting worse. These strategies for prevention can include the early provision of equipment and services to help prevent, delay or reduce the development of further need for care and support, which would include the provision and fitting of grab rails depending on the cost.
The care and support assessment aims to identify any difficulties you may be having in caring for yourself and how this impacts upon your wellbeing. If you have someone who helps you, they can have a carer’s assessment to see if they also need support to continue in their caring role.
Funding sources
Local authority funding for minor adaptations (which would include grab rails) varies slightly across the United Kingdom. In England, if you are assessed as eligible for preventative intervention, items like grab rails under £1000 would be free of charge to you. If the rail was very large, perhaps going alongside a ramp externally, and cost more that £1000, you may have to apply for a Disabled Facility Grant (DFG). DFGs operate across England, Wales and Northern Ireland. Conditions for DFGs will vary according to the country in which you live. For more information on Disabled Facilities Grants, visit the GOV.UK website. For details of schemes in Scotland see Disability Information Scotland.
The Money Advice Service has some useful information about funding for adaptations.
Statutory direct payment, personal budgets and prescriptions
You may be provided with equipment and services as a preventative measure, before a needs assessment is done. You would not pay for this. If, on assessment, your needs are high enough to qualify for further help from the council, they will then look at your income and savings to see whether you will need to pay towards any future services you receive. These services might include further disability equipment or adaptations to your home, help from a carer, telecare, the delivery of meals or residential care.
If you are provided with direct payments or a personal budget from the council, you can pay for equipment and other one-off purchases, so long as they have been identified as needed in your health and social care assessment (Mandelstam 2016, section 1.11).
In many areas a range of the simple aids to daily living may be available on prescription, issued by the assessor. If you receive a prescription for equipment you can take it to a local accredited retailer, which may be a local pharmacy, who will provide you with the item. You can pay extra for an alternative item, so long as it does what the specific item prescribed would do. Your choice may offer extra features, or perhaps you prefer its appearance. There is usually a list of accredited fitters available for items like grab rails.
If you are unsure about obtaining and fitting rails, seek advice from your council. They should be able to provide you with information and advice about services or resources which could help you.
Private purchase
If you decide to buy equipment privately it is best to try and compare the different ranges of grab rails first. You may have an equipment demonstration centre near you where you can visit to view and try out different equipment. You will receive impartial advice to help choose appropriately. Contact details for your nearest equipment demonstration centre can be found on the Disabled Living Foundation's webpage, Equipment Demonstration Centres in the UK.
Look for a sales company that belongs to a trade association, such as the British Healthcare Trades Association (BHTA). BHTA members have signed up to a code of practice governing standards of customer service. Further details are given in the
Useful organisations and resources section.
Charity and grant funding
Charitable trusts may sometimes provide funding for equipment. A useful resource is Turn2Us, a website that allows you to search for organisations that give grants, including for equipment and other services. Charities tend to give awards in accordance with a predetermined criteria, so it is important that you carefully select the organisations that you apply to.
Another useful source of information is a website called My Grants. This gives information on statutory and charity grant funding.
The Grants for Individuals website is run by the Directory of Social Change and lets subscribers search for grants. It is intended for organisations searching for funding on behalf of individuals.
VAT relief
If you have a diagnosed long term condition, you may be able to claim VAT relief on the purchases, thus reducing the cost. Ask the supplying company or check their website for further information.
For further advice from us
For clear, practical advice and information on products and suppliers of daily living equipment, please have a look at our Living made easy website.
If you would like further advice related to choosing equipment for everyday living you could try relevant sections of AskSARA, our free online guided advice tool. AskSARA will ask you questions about yourself and your environment and then offer relevant advice, product suggestions and supplier details.
You can contact the DLF Helpline, which is open Monday to Friday from 10am to 4pm. Tel: 0300 999 0004 (calls charged at your standard landline rate even if you are phoning from a mobile).
Alternatively, you may wish to contact us via email: info@dlf.org.uk or by letter: DLF, 34 Chatfield Road, Wandsworth, London SW11 3SE
To help us give you a concise and informative reply, please provide us with as much detail as possible, including information on the difficulties you are having and any solutions you have considered, such as equipment ideas.
Another source of advice is a disabled or independent living centre where you would have the opportunity to try out a range of equipment. There are several of these around the country where you can go for impartial advice. Your local authority will also be able to give you details of centres in your area.
Useful organisations

New Loom House
Suite 4.06
101 Back Church Lane
London, E1 1LU
The BHTA is the largest trade association for suppliers and manufacturers of mobility and homecare products. They have a code of practice to which their members sign up. Contact the BHTA to obtain a list of members in your area.

20-21 Red Lion Court
London EC4A 3EB
The Centre for Accessible Environments (CAE) is the UK's leading authority on inclusive design. Their aim is to help secure a built environment that is usable by everyone, including disabled and older people.

3rd Floor
89 Albert Embankment
London SE1 7TP
Email: info@firststopcareadvice.org
Website: www.housingcare.org/index.aspx
A charity providing free, independent information and advice on housing and care services for older people across the UK.

Foundations is appointed by the Department of Communities and Local Government to oversee a national network of nearly 200 home improvement agencies (HIAs) and handyperson providers across England.

Website: www.grantsforindividuals.org.uk/default.aspx
The Grants for Individuals website is run by the Directory of Social Change and lets subscribers search for grants. It is intended for organisations searching for funding on behalf of individuals.

Website: www.gov.uk
GOV.UK is the website for the UK government. It's the best place to find government services and information. GOV.UK has a section devoted to providing information for older adults and individuals with a disability.

Website: www.moneyadviceservice.org.uk
Money Advice Service offer free and impartial money advice, set up by government. Further reading: Major or minor adaptations

Website: www.planningportal.gov.uk
Planning Portal is the first port of call for anyone wanting to find out about the planning system in England and Wales. Its aim is to provide a one-stop-shop supplying answers, services and information to anyone involved in the planning process - from home owners and businesses to planning professionals and Government officials. Further guidance and regulations about access to and use of buildings (Part M): www.planningportal.gov.uk/buildingregulations/approveddocuments/partm/approved

G03, The Wenlock
50-52 Wharf Road
London N1 7EU
Telephone: 020 7427 2460
Email: mail@rica.org.uk
Website: www.rica.org.uk
Rica is a UK research charity providing information for older and disabled people. More information on bathing accessories including grab rails can be found here

Customer Service Centre
Castlemead
Gascoyne Way
Hertford
SG14 1LH
Telephone: 01992 822 800
Email: support@which.co.uk
Website: www.which.co.uk/elderly-care
Which? is a brand name used by the Consumers' Association. It promotes informed consumer choice in the purchase of goods and services, by testing products, highlighting inferior products or services, raising awareness of consumer rights and offering independent advice. Which? Elderly Care is a free website created by Which? to provide independent information on all aspects of care for older people. Which? have some general guidance on choosing and fitting grab rails.
Updated December 2017, next review by December 2020, Version 2
References Show references
British Standards Institute (2015) Requirements for Electrical Installations. IET Wiring Regulations. BS 7671:2008+A3:2015. 17th ed. London:BSI. (Type 2)
British Standards Institute (2010) Design of buildings and their approaches to meet the needs of disabled people – Code of practice BS8300:2009+A1:2010. London:BSI. (Type 2)
College of Occupational Therapists (2006) Minor adaptations without delay. London: COT. (Type 2)
Disabled Living Foundation (2014) Trusted Assessor Training Course handbook, Disabled Living Foundation: London. (Type 2)
Great Britain. Parliament (2014) Care Act 2014. London: Stationery Office.
H M Government (2016) Part M Building regulations - Access to and use of buildings. Volume 1 –dwellings. 2015 edition with 2016 amendments. London: NBS. (Type 2)
Available from: https://www.planningportal.co.uk/info/200135/approved_documents
H M Government (2015) Part M Building regulations - Access to and use of buildings. Volume 2 –buildings other than dwellings. London: NBS. (Type 2)
Available from: https://www.planningportal.co.uk/info/200135/approved_documents
H M Government (2013) Part K Building regulations - Protection from falling, collision and impact. London: NBS. (Type 2)
Available from: https://www.planningportal.co.uk/info/200135/approved_documents
Mandelstam M (2016) Legal framework for equipment provision guidelines. London: London Borough Occupational Therapy Management Group. (Type 2)
Pain H, McLellan L and Gore S (2003) Choosing assistive devices: a guide for users and professionals. Jessica Kingsley Publishers : London and Philadelphia. (Type 1)
For more information on the Types of Evidence, please visit /www.livingmadeeasy.org.uk/scenario.php?csid=276
AskSARA
If you would like further advice regarding daily living equipment related to choosing equipment for everyday living you could try relevant sections of AskSARA. AskSARA is our free online guided advice tool. AskSARA will ask you questions about yourself and your environment and then offer relevant advice, product suggestions and supplier details.
AskSARA's Entering the Home section
AskSARA
If you would like further advice regarding daily living equipment related to choosing equipment for everyday living you could try relevant sections of AskSARA. AskSARA is our free online guided advice tool. AskSARA will ask you questions about yourself and your environment and then offer relevant advice, product suggestions and supplier details.
| Attachment | Size |
|---|---|
| 6.95 KB | |
| 5.94 KB | |
| 12 KB | |
| 4.56 KB | |
| 1.79 KB | |
| 3.54 KB | |
| 6.52 KB | |
| 1.19 KB | |
| 5.94 KB | |
| 20.45 KB | |
| 8.6 KB | |
| 22.21 KB | |
| 20.12 KB | |
| 16.68 KB | |
| 3.45 KB | |
| 3.63 KB | |
| 7.58 KB | |
| 15.13 KB | |
| 5.65 KB | |
| 4.95 KB | |
| 17.33 KB | |
| 15.13 KB | |
| 34.47 KB | |
| 30.58 KB | |
| 15.72 KB | |
| 25.66 KB | |
| 8.28 KB | |
| 390.86 KB |
All rights reserved. No reproduction or transmission of this publication may be made without written permission. Inclusion (including any sponsorship) does not indicate endorsement or that any item has been recommended or tested. All information is provided without legal responsibility.
Disabled Living Foundation, Tel: 020 7289 6111, Fax: 020 7266 2922, Helpline: 0300 999 0004 10.00am-4.00pm, Email: helpline@dlf.org.uk, Website: www.dlf.org.uk
Reg. Charity No: 290069, VAT Reg. No: 226 9253 54
 (Tell me about the standard)
Your personal information is required in order to claim Gift Aid. This information is kept by DLF/Shaw Trust for financial audit purposes. For more information on our privacy policy visit: https://www.dlf.org.uk/content/privacy-policy
This factsheet is sponsored by Argos
 Sponsorship has no influence on our impartial content